How to Edit an SVG File Online
A complete editor workflow: import or start fresh, edit individual objects and paths, save local drafts, and export.
In this guide 7 sections
You can edit an SVG file online by importing it into the free SVG.design editor, selecting the part you want to change, and exporting the result. Use Select to arrange objects, Anchor to reshape paths, and Pen to draw new artwork. No account or desktop installation is required for these editor tools.
This guide covers the complete workflow, including grouped imports, gradients, local drafts, and the choice between SVG and image exports.
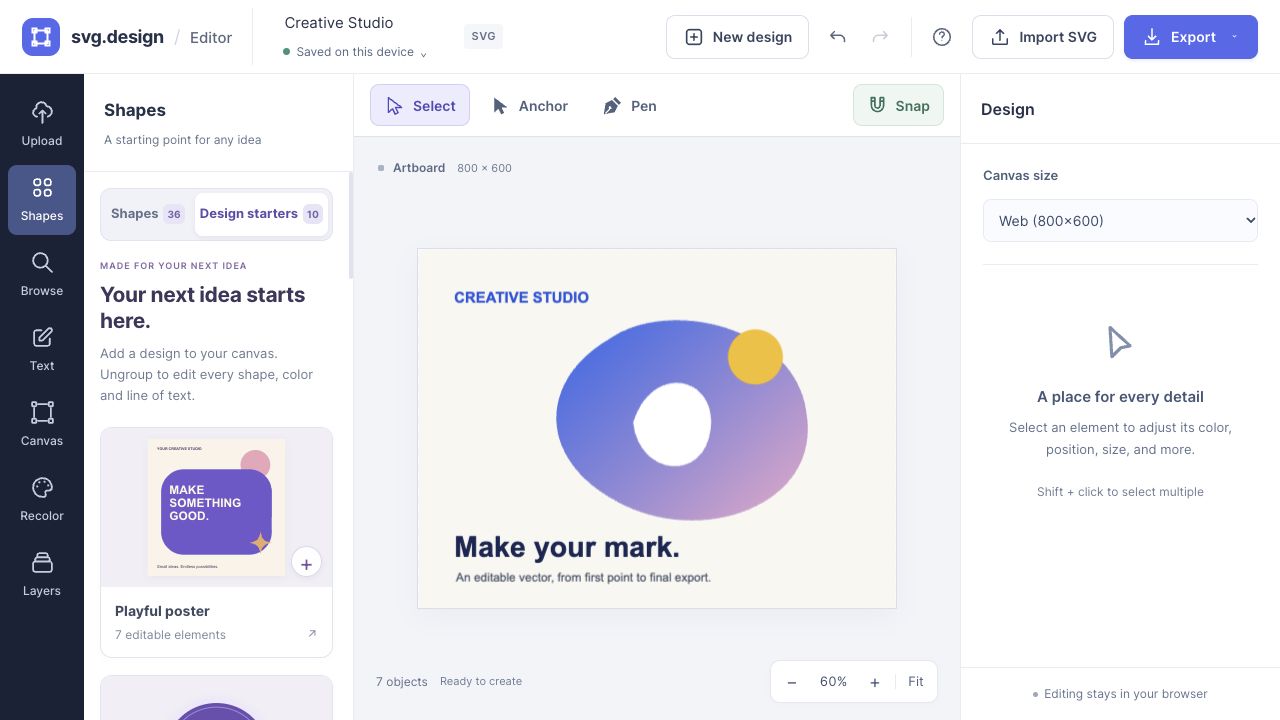
1. Start a new design or resume a draft
If you have used the editor in the same browser, it may reopen your recent design. Choose Keep editing to continue or Start fresh for a blank canvas. The New design button in the top bar also starts a separate design and keeps the previous work in Local drafts when storage is available.
Use the save-status button below the design name to browse drafts with artwork previews. They stay in the current browser and device; they do not sync to an account. See autosave and draft recovery before relying on them for important work.
2. Import an SVG or choose a starting point
- Import SVG: choose a file from the top bar or Upload tab, or drag an SVG onto the canvas.
- Paste SVG code: open the paste dialog and add your SVG markup. Ctrl/Cmd + V can also import SVG markup from the clipboard while working on the canvas.
- Browse: find library artwork inside the editor. Check the asset’s license for your intended use.
- Shapes: insert a shape or line, or choose one of ten editable design starters.
- Text: add a heading, subheading, or body text.
Match canvas to first SVG fits the artboard dimensions to your first import when enabled. For a planned output size, choose a canvas preset or custom dimensions instead. Import additional SVGs to combine artwork on one canvas.
A PNG or JPG is not automatically converted into editable paths by importing it. To trace a raster image, use the separate vectorizer, which uses PRO credits.
3. Select the element you want to edit
Use Select (V) to move, scale, and rotate objects. If the entire illustration moves together, look for This artwork is grouped and choose Ungroup & edit elements. Nested groups may need more than one ungroup operation.
Use Layers to choose objects that are difficult to click. Shift-click objects or use the layer checkboxes for a multiple selection. Choose Group selected layers to keep a finished component together. Read the grouping guide for shortcuts and nested artwork.
4. Change colors, text, and layout
- One object’s color: use Fill and Stroke in the right panel. For a blend, choose Linear or Radial under Fill style and edit the gradient stops.
- Colors across the design: the Recolor tab swaps matching solid fills and strokes, including those inside groups.
- Text: double-click an editable text object or use Text content and Typography in the right panel. Text already converted to paths in the source file is geometry, not editable words.
- Size and position: use the selection handles or enter X, Y, width, height, and rotation. Keep Lock proportions enabled when you want the original aspect ratio.
- Alignment: enable Snap for smart guides or use Align to artboard for exact centering.
- Background: open Canvas for the artboard background. A colored rectangle inside the imported artwork is a separate layer.
5. Edit paths or draw a custom shape
Choose Anchor (A or N) on an individual path or supported basic shape. Drag its anchors, use Curve point or Corner point, and adjust the selected point’s teal handles. See editing SVG nodes and Bézier handles for a complete walkthrough.
Choose Pen (P) to create a new outline. Click for corners, drag for curves, then finish an open path or close a filled shape. Follow the Pen tutorial for a practical example.
6. Export the right format
| Format | Choose it for |
|---|---|
| SVG | Scalable vector artwork, editable paths, and gradient definitions |
| PNG | A fixed-size image with transparency when the artwork and background allow it |
| JPG | An opaque pixel image; transparent areas use a white background when needed |
Use the raster scale setting when you need a larger PNG or JPG. The editor limits raster output to 32 megapixels. Export does not automatically optimize every SVG: use the separate optimizer if you need a smaller file, and compare the result visually.
Questions about editing SVG files
Can I edit SVG files without Illustrator or Inkscape?
Yes. You can arrange elements, change colors and text, draw paths, edit nodes, and export in your browser. Advanced desktop features such as Boolean path operations and text-to-outline conversion are not currently available in this editor.
Will every imported SVG look identical?
Check the result after importing. Fonts, filters, masks, and other complex SVG features can behave differently when converted into editable objects. Keep the original file and inspect important exports in their destination application.
Does autosave create a permanent backup?
No. Local drafts help you resume on the same browser and device. Clearing site data can remove them. Download an SVG copy to keep your work outside the browser.
Make it yours.
Keep this guide open and give it a try.