How to Create a Dieline Template for Cards and Packaging
Choose a card or packaging template, understand finished versus flat size, and export clear cut and crease instructions.
In this guide 6 sections
The Vector Dieline Generator creates SVG templates with named cut, crease, and optional guide layers. Choose a category, enter the intended dimensions, and inspect the flat template before adding artwork or making a physical sample.
1. Choose the template category first
Template category changes the kind of object you are making. Choices include Greeting Cards, Business Cards, Book Cover, Labels & Stickers, a playing-card tuck box, envelopes, hang tags, and hang-tab packaging.
Start with a preset close to the intended job instead of treating every category as an interchangeable box. A flat label does not need the folds of a carton, and a greeting card’s finished size has a different meaning from its open sheet size.
2. Read the finished and flat dimensions
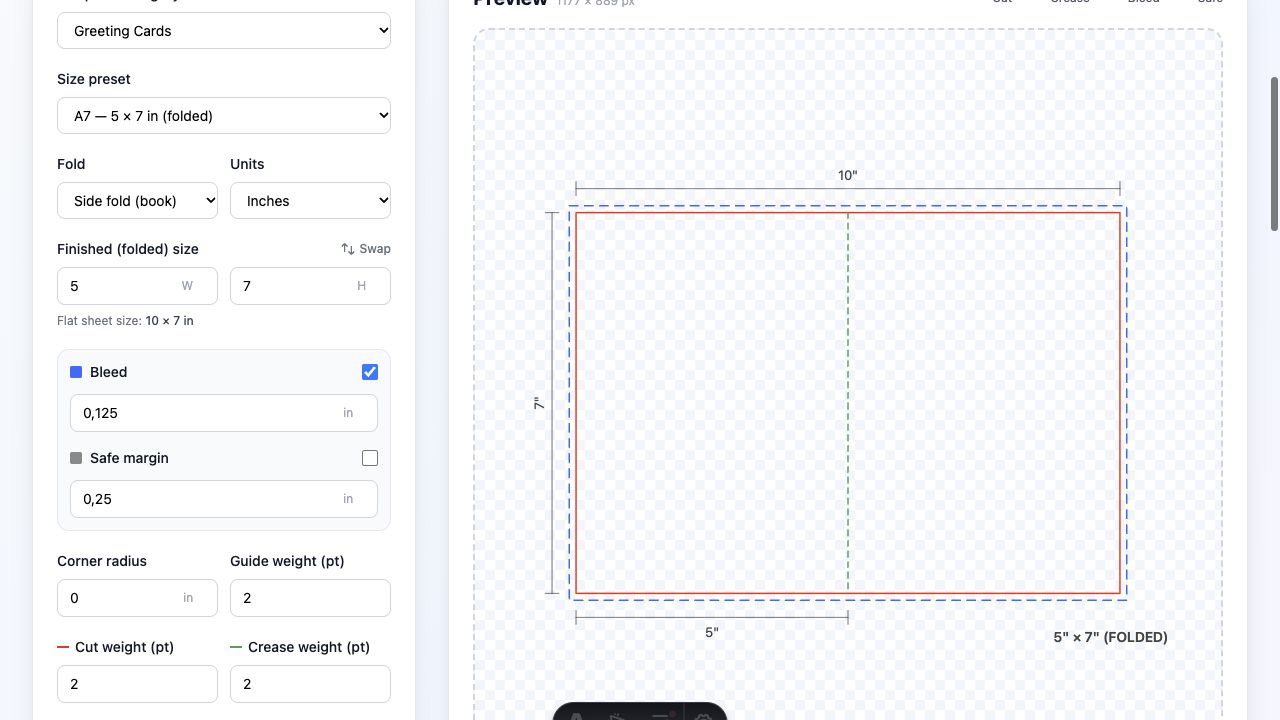
For a card example, choose Greeting Cards, the 5 × 7 in folded preset, and Side fold. The finished card is 5 × 7 inches, while the open sheet is 10 × 7 inches before any additional guide area. A Top fold changes the arrangement of those panels.
Choose Inches, Millimeters, or Pixels under Units and read the dimension labels after switching. Use Swap width and height only when you intend to change orientation. Preset names are not a reason to skip checking their explicit measurements.
3. Set bleed and safe margins for the job
Bleed marks extra artwork beyond the cut boundary so small trimming variations do not leave an unprinted edge. Safe margin marks an inset area for important text and symbols. Use the measurements required by the provider producing the item.
Enabling a bleed guide does not extend your artwork automatically. When you add a background image or color, make sure it reaches the required bleed area. Keep essential text inside the safe area rather than against a cut or crease.
Corner radius and the guide, cut, and crease weight controls change the drawn template. Canvas margin, Square canvas, and Show dimensions affect its presentation and guide space. Check these settings before downloading.
4. Understand the named lines and layers
The exported SVG uses cuts for red trim paths and creases for green fold paths, with optional bleed, safe, and dimensions layers. Read the preview legend and confirm how your destination application handles those layers.
Guide colors are instructions in this template, not a universal machine standard. Tell the production provider which lines are structural and which content is artwork. Do not accidentally print measurement labels as part of the finished design or send guide lines as unintended cuts.
5. Export, add artwork, or inspect the fold
Choose Download SVG for editable vectors, Copy SVG for markup, or PNG/JPG for a visual reference. Keep the SVG master when dimensions or structural paths matter.
Add artwork in an application that preserves the template’s scale and layer structure. You can use the editor for a visual composition, but verify physical measurements again after any import and export rather than assuming unchanged production units.
Choose Fold this dieline in 3D to review supported templates in Fold Studio. This helps inspect panel placement; it does not simulate every material, glue flap, or manufacturing tolerance.
6. Verify a physical proof
Open the delivered file in the actual production application, check a known dimension, and print a test at 100% scale with unintended fit-to-page scaling disabled. Fold or assemble a sample when appropriate.
The print checker can flag common SVG issues, but confirm bleed, colors, material allowance, and cut/crease interpretation with the provider before producing a batch.
Make it yours.
Keep this guide open and give it a try.